How to upload a list of configuration data to the Apollo 500+?
The following document is intended to be a troubleshooting guide to ensure you are uploading a List of Configuration Data to your Apollo 500+ in the correct manner (you cannot load a List of Configuration Data to the Apollo 400). Please check all aspects of this before contacting the technical support helpline.
- Please register your Apollo to receive an additional 12 months warranty plus full access to Product Support. You can do this at www.seaward.com/warranty24 or by completing the form in the “Care and Support” card and returning by post.
- Please ensure your Apollo has the latest firmware installed, to do this please see the following link: www.seaward.com/apollo-series-firmware
- Please ensure you have the latest version of PATGuard 3 - in the software select “Help” and “Check for Updates”, note you need to be an Administrator to update PATGuard 3.
1. The latest version of the Apollo 500+ firmware will allow you to upload a text file containing an updated list of descriptions that can be selected by the instrument. The lists that can be updated are (note; in brackets are the names used by the text file to represent that field and the maximum number possible):
|
Asset Description |
[Comment] |
100 |
|
Location |
[LocationName] |
100 |
|
Site |
[Site Name] |
100 |
|
Asset Group |
[CommentGroup] |
300 |
|
Make |
[CommentMake] |
300 |
|
Model |
[CommentModel] |
300 |
|
Notes |
[CommentNotes] |
300 |
|
Custom User Test |
[UserTestName] |
100 |
|
Custom User Test Units |
[UserTestUnits] |
100 |
|
Result of Custom User Test |
[UserTestResult] |
100 |
2. The text file used to update the Apollo 500 must use the names above, and [END] and in the format below (note; this example is shown without data – just the field names). For an example showing data please see step
3 on the next page.
3. See below for an example of a populated text file.
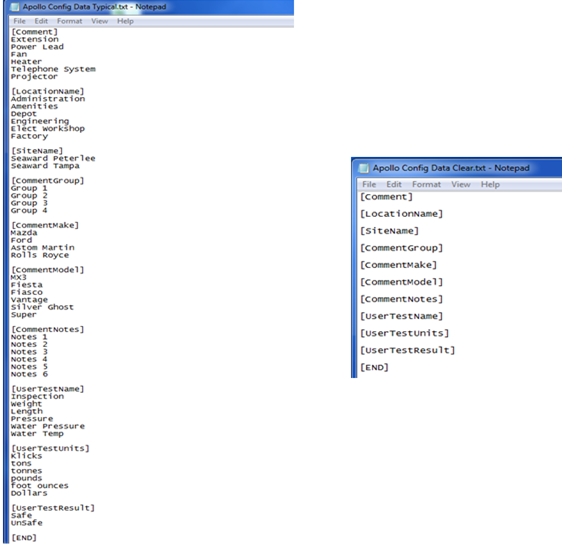
Note: A template text file with data can be downloaded from the following link: ConfigTest8_AllTypical
A blank template text file can be downloaded from the following link: ConfigTest7_ClearAll
4. To upload the list; on the Apollo “Home Screen” ![]() select menu/options, function key “F4”.
select menu/options, function key “F4”. ![]() Please note as a default, the Apollo will start up in the “Home Screen”.
Please note as a default, the Apollo will start up in the “Home Screen”.
5. In the menu select “Upload” by using the arrow keys or selecting, key number “7”. ![]()
6. In the “Upload data into Apollo” field select “List Configuration Data”, using the arrow keys to select from the dropdown menu.
7. If using the USB cable:
- Connect your Apollo to the PC using the supplied cable and in the in the “using:-” field select “![]() USB-PC cable”
USB-PC cable”
- An additional Apollo drive (for example Apollo E:) will appear on your PC. Transfer your Configuration Data to this drive using “Windows Explorer”.
- When this is complete, on the Apollo select the function key “F3” ![]() . In the field below “Valid data files from PC…” select the file containing your Configuration Data, using the arrows keys, and save by selecting “F4”
. In the field below “Valid data files from PC…” select the file containing your Configuration Data, using the arrows keys, and save by selecting “F4” ![]()
OR
8. If using a USB Flash Memory Stick:
- Insert your memory stick into the correct port on the Apollo and in the “using:-” field select “ ![]() Flash Memory Stick”
Flash Memory Stick”
- In the field below “Valid data files from USB memory stick…” - select the file containing your Configuration Data, using the arrows keys, and save by selecting “F4”![]()
9.The Apollo 500+ will begin the upload and in the “Apollo Configuration Upload” message display the field name and number of each uploaded, for example;
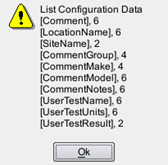
10. Press “OK” to accept the upload. This uploaded data can then be used from the dropdown selections when setting up / using your Apollo 500+

I'd like to talk to a sales advisor


Sign up to our Newsletter.
Stay up to date with the latest industry and product news, as well as our free educational content such as webinars and our expert guides.
Close