How to setup custom user tests in the Apollo 500+
The Apollo 600+ and the Apollo 500+ test instrument has the ability to add or edit test sequences for other, non PAT related, tests and inspections (This is not applicable to the Apollo 400+). Please check all aspects of this before contacting the technical support helpline.
Please register your Apollo to receive an additional 12 months warranty plus full access to Product Support. You can do this at www.seaward.com/warranty24
In order for these new features to work you will need to ensure your Apollo has the latest firmware installed, to do this please see the following link: www.seaward.com/apollo-series-firmware
Please ensure you have the latest version of PATGuard 3 - in the software select “Help” and “Check for Updates”, note you need to be an Administrator to update PATGuard 3.
Adding a new User Test in the Apollo 600+ and Apollo 500+
1.From the Apollo “Home Screen” ![]() press the Menu button “F4”.
press the Menu button “F4”. ![]() Please note as a default, the Apollo will start up in the “Home Screen”
Please note as a default, the Apollo will start up in the “Home Screen”
2.In the menu select “PAT Edit” by pressing key number “4” ![]() . This shows a list of all current test sequences, use the button “F3”
. This shows a list of all current test sequences, use the button “F3” ![]() to open up “Test Sequence Options” menu.
to open up “Test Sequence Options” menu.
3.Select “Add New” using the arrow keys and accept using button “F4” ![]() . This will add a new sequence to the bottom of the list.
. This will add a new sequence to the bottom of the list.
4.With the “New Test Sequence” highlighted press the menu button “F3” ![]() to open up “Test Sequence Options” menu.
to open up “Test Sequence Options” menu.
5.Select “Edit” using the arrow keys and the accept button “F4” ![]() . This will open up the test sequence for editing.
. This will open up the test sequence for editing.
6.To edit the name of the sequence press the edit button “F4” ![]() . You can then give it a relevant name and press the save button to store “F4”
. You can then give it a relevant name and press the save button to store “F4”![]() .
.
7.Press the add test button “F2” ![]() to add a test or inspection to the sequence. Use the arrow keys to select which test or inspection you would like to add from the list and accept using button “F4”
to add a test or inspection to the sequence. Use the arrow keys to select which test or inspection you would like to add from the list and accept using button “F4” ![]() .
.
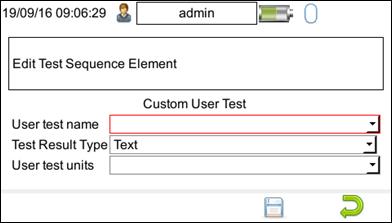
8.If you select the “Custom User Test” option (latest version of Apollo 600+ and Apollo 500+ firmware only) you will then need to give it a “User test name” either from the dropdown or by typing free text into the box. You can then add the “Test Result Type” (either None, Text or Numeric) and finally add the “User test units” either from the dropdown or by typing free text into the box and press the save “F4” ![]() button to store.
button to store.
Note: You can upload a “List of Configuration Data” to be used in the above selection – please see separate application note on uploading this list.

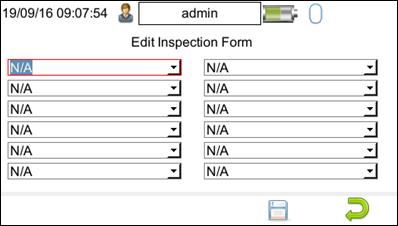
9. If you select the “Custom Inspection Form” option (latest version of Apollo 600+ and Apollo 500+ firmware only) you find an “Edit Inspection Form” setup screen with 12 options. In each of these (or the number required up to 12) select a test name either from the dropdown or by typing free text into the box and press the save “F4” ![]() button to store.
button to store.
Note: Any fields left N/A will not be included. In addition, you can upload a “List of Configuration Data” to be used in the above selection – please see separate application note on uploading this list.

10. Repeat step 7 until you have added all of the required tests.
11.Once complete press the back button “F5” ![]() and then select yes by pressing the “Y” key when asked if you want to save changes.
and then select yes by pressing the “Y” key when asked if you want to save changes.
12.If you wish to move the newly created test sequence up or down the list you can do this using the arrow keys on “F2” & “F4”.
13.From the home screen select PAT “F1” ![]() and then auto test “F2”
and then auto test “F2” ![]() . Your test sequence will be available from the menu.
. Your test sequence will be available from the menu.
Editing a Test Sequence / User Test in the Apollo 600+ and Apollo 500+
14.From the Apollo “Home Screen” ![]() press the Menu button “F4”.
press the Menu button “F4”. ![]() Please note that as default, the Apollo will start up in the “Home Screen”.
Please note that as default, the Apollo will start up in the “Home Screen”.
15.In the menu select “PAT Edit” by pressing key number “4”. ![]()
16.This shows a list of all current test sequences. Use the up “F2” and down “F4” keys to highlight the test sequence and press the menu button “F3” ![]() to open up “Test Sequence Options” menu.
to open up “Test Sequence Options” menu.
17.Select Edit using the arrow keys and the accept button “F4”![]() . This will open up the test sequence for editing.
. This will open up the test sequence for editing.
18.To edit an element of the sequence use the blue arrow keys to select and press the edit button “F4” ![]() . Once you have made the required changes press the save button to store “F4”
. Once you have made the required changes press the save button to store “F4”![]() .
.
19.You can use the button “F2” ![]() to add a test or inspection to the sequence. Use the blue arrow keys to select which test or inspection you would like to add from the list and accept using “F4”
to add a test or inspection to the sequence. Use the blue arrow keys to select which test or inspection you would like to add from the list and accept using “F4” ![]() . You can then select the parameters required and press the save button to store “F4”
. You can then select the parameters required and press the save button to store “F4” ![]() .
.
20.To delete a test or inspection from the sequence press the delete test button “F3” ![]() .
.
21.Once complete press the back button “F5” ![]() and then select “Yes” by pressing the “Y” key when asked if you want to save changes.
and then select “Yes” by pressing the “Y” key when asked if you want to save changes.
22.If you wish to move the test sequence up or down the list you can do this using the arrow keys on “F2” & “F4”.
23.From the home screen select PAT “F1” ![]() and then auto test “F2”
and then auto test “F2” ![]() . Your test sequence will be available from the menu.
. Your test sequence will be available from the menu.

I'd like to talk to a sales advisor


Sign up to our Newsletter.
Stay up to date with the latest industry and product news, as well as our free educational content such as webinars and our expert guides.
Close