How do I upload a logo into PrimeTest 300/350 series tester?
Logo Characteristics
The logo used must have a maximum size of 320 pixels by 240 pixels. It must be saved as Monochrome Bitmap, and the colours must be inverted.
A simple program to use in order to change the file type for upload is Microsoft Paint. Open your logo in this program, press File then Save As.
A box will open offering the user a location to save into, at the drop down box adjacent to Save as Type, ensure you select Monochrome Bitmap.
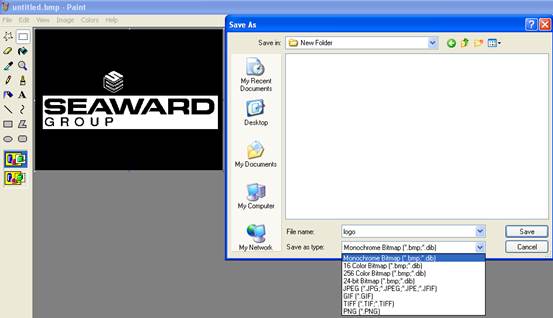
If you require a white background when printing your logo, you will need to ensure the colours are inverted (eg Black background on the image), as shown above. To invert your colour scheme within Paint, simply click Image from the top menu bar, then Invert Colours. Once again ensure your file is saved as Monochrome Bitmap.
Transferring the Logo to your Tester
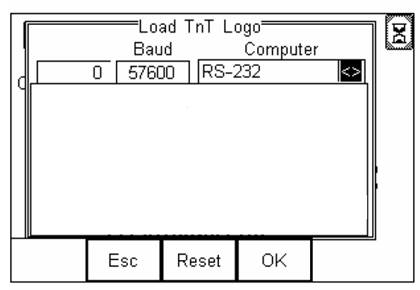
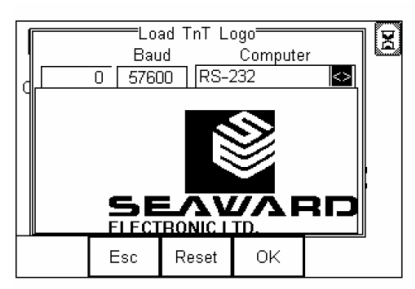
Turn your tester on and go into the main menu, scroll to Data Transfer, press OK then scroll down to Load TnT Logo. The following screen will appear.
Bluetooth Connection
Within the computer tab you should see the computer name that you originally paired the tester with. If not use the left or right arrow to scroll until you find the computer. Await the egg timer to change into the Bluetooth Icon and the tester is ready to receive data.
Wired Connection (PT350 Only)
Within the computer tab you will need to ensure RS-232 is selected. The Tester is now configured to receive the logo.
Computer Transfer Application
Run the file Seaward DataTransfer.exe application, this can be found on the Utilities Disc provided with your tester. The following program will open.
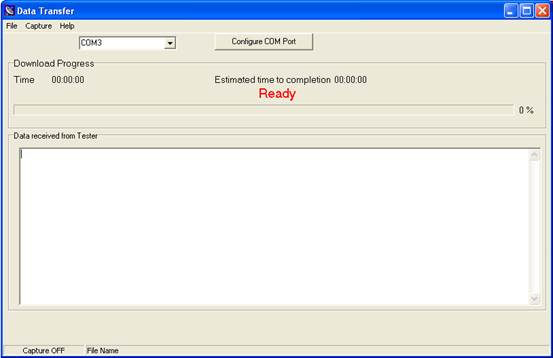
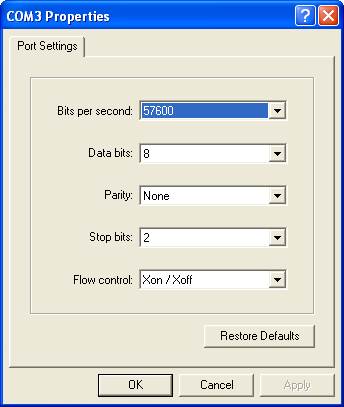
Ensure you have selected the correct COM Port, this will be the same port used for downloading of test results. You can check the port settings by clicking Configure COM Port. A display will appear, ensure your settings are set as below. If not change them and confirm by pressing Apply, then OK.
On the Data Transfer utility, press File, then click the Send File option, A pop up will appear, automatically looking for Bitmap files, (.bmp). Select the logo file you saved earlier and the transfer should automatically begin.
A progress bar on the application will indicate file transfer, and the amount of data received will be shown numerically in the top left hand of the tester screen.
Once the progress is complete, you should see the logo displayed on the tester. Do not be alarmed if the logo does not appear centralised within the display. Press Ok to return to the main screen on the tester.
Select Logo to Print
In order to apply a logo to the print label you must instruct the tester where to look for the logo.
On the main screen of the tester press Menu, scroll to View Saved Data. If you do not have any data on your tester it is advisable to perform a test in order to have a result.
Highlight any test and press the Select (F4), a Test Details screen will then be displayed. Press the soft key Options (F4), select the option Print Label.
You should then see the label display, at this point press the soft key Setup (F3), and the following screen will be displayed.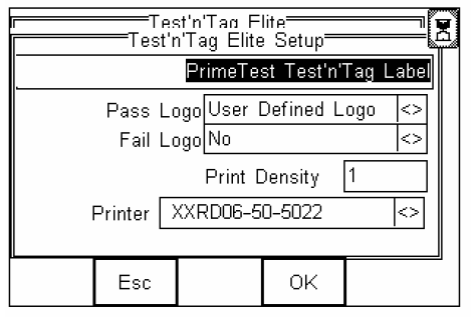
To apply the logo, to both Pass and Fail Labels, scroll down to Pass Logo and change the option to User Defined Logo, as shown above, repeat the process for the fail logo and your tester is configured to print your logo.
I'd like to talk to a sales advisor


Sign up to our Newsletter.
Stay up to date with the latest industry and product news, as well as our free educational content such as webinars and our expert guides.
Close