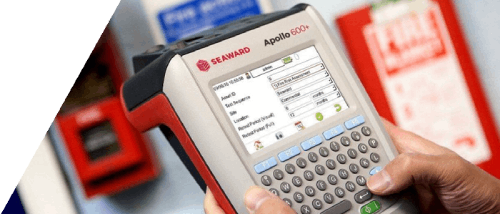
How to setup Desk TnT print format for Safetest Luminaire
-
First Start up the Tester
- Select the ‘Open File’ symbol key (3rd key down RHS)
- The tester will display a two options main header menu:
- The → (arrow pointer) represents the active cursor.
- To select options use Up/Down (↓) arrow to move cursor.
- To accept option (with cursor indicator) press <enter> (the carriage return symbol), green 4th key down RHS. -
Select Setup Tests/Data at Main Menu
- Go to Test routine.
- → Setup Tests / Data.
- Enter a valid password using keypads (the tester maybe factory set with a blank password).
- Input Password (PW:).
- When a valid password is correctly identified the Display will show two options:
- Select Data / Password / Start option.
Edit Test Sequence
→Data / Password / Start
- Select the Setup Data Mode option.
→ Setup Data Mode
Download / Delete
- Select either Print only or Print & Save Readings.
→ Print Only
Save Only
→ Print & Save Rdgs
Omit Print & Save -
Use up/down arrow to scroll ^ v for options, press <enter> to select.
-
User Must select Print Test & Tag format to print label to Desk TnT printer.
→ Print Test & Tag
PC term / PATGuard
Note: Do Not select PC term / PATGuard format when printing to Desk TnT printer.
After completing the setup configuration, press the ‘Open File’ symbol key to return to Main Menu. -
Notes on Setup Data Mode
This will allow four modes of Data processing for configuration:
- Print Only
This mode will send test results to printer port after each completed sequence.
- Save Only
This mode will only save to memory test results after each completed sequence.
- Print & Save readings
This mode will send data to printer port And save to memory test results taken after each completed sequence.
- Omit Print & Save
Note:
Warning : This mode will not retain any of the test results or readings taken once test sequence is completed.
I'd like to talk to a sales advisor


Sign up to our Newsletter.
Stay up to date with the latest industry and product news, as well as our free educational content such as webinars and our expert guides.
Close