How do I set a test sequence for a 230V Multi Way Lead, using Supernova or Europa Plus?
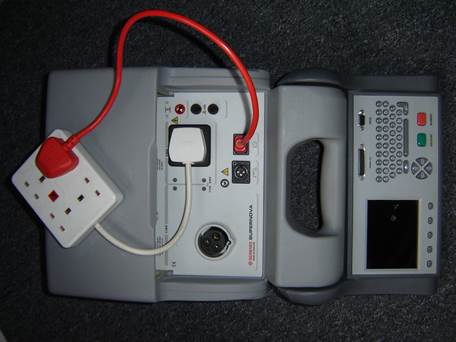
Both the Supernova and Europa Plus portable appliance testers come with 17 Factory programmed test sequences. It is not possible to add any extra sequences to this list, therefore in order to add this sequence one of the existing sequences must be sacrificed, ideally one that is not used.
From the Main menu of the tester, scroll to SETUP and press the green button to enter that menu.
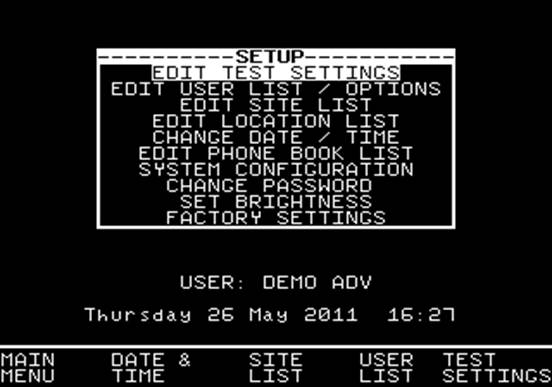
From this point scroll to EDIT TEST SETTINGS and again press green to enter the next screen.
At this point the tester displays the listing of all programmed test settings. Bear in mind that the one you choose to alter will be overwritten.
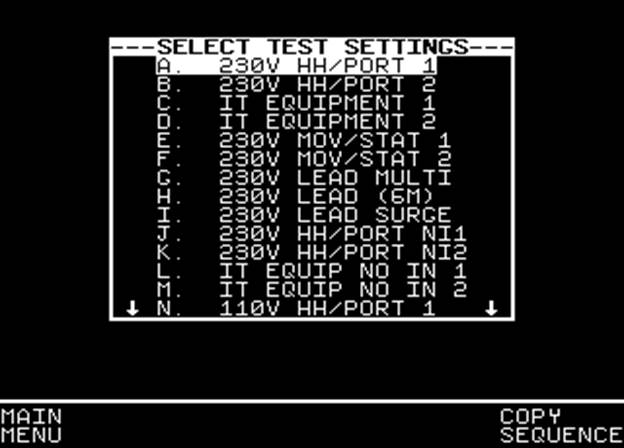
Select one of the sequences from this list, and press Green Button to enter the TEST SETTINGS EDITOR.
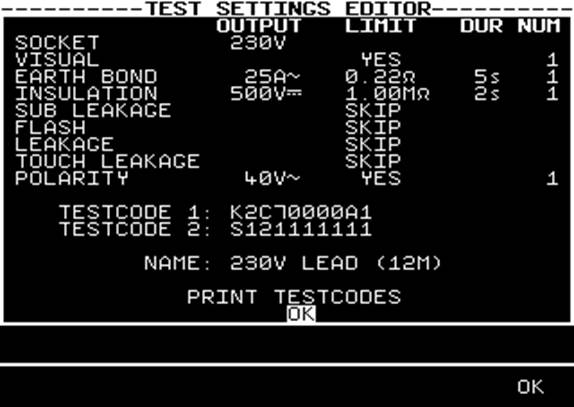
This screen shows the sequence of tests to be performed. In the example above it has been decided to alter the 12m 230V lead test.
Firstly ensure the socket is set to 230V, if this is not the case, use the up/down arrows on the directional keypad to highlight SOCKET, pressing the green button will switch between 115V and 230V.
In line with the IEE Code of Practice for In Service Inspection and Testing of Electrical Appliances, a visual test is recommended, again scroll to visual and press the green button to toggle between YES and SKIP.
The next test required to be included will be an Earth Bond, it is recommended the following conditions apply. To enter the Test Settings Editor screen scroll to Earth Bond and press Green.
Once in the test settings editor screen, use the left and right arrows to change fields, and the up and down arrows to change values.
It is recommended that the following settings are set
Output: 25A
Limit: The absolute minimum for this will be 0.1, in line with the IEE’s recommendation that Earth Bond pass limit will be 0.1+R where R is the resistance of the cable, and R will vary depending upon the lead length and cross sectional area. Calculate accordingly or use the Earth Bond Limit Calculator, during the test sequence to define.
Duration: 5s
Number: UL (This defines how many times the test will be performed, in this instance we do not know how many sockets we are likely to test, therefore setting the number to unlimited will allow us to test as many sockets as we need.)
Once all these values have been set, press the Far right soft key (5 of these situated below the screen), corresponding to the OK on screen.
The next step is to perform an Insulation test on the lead, once again scroll to insulation, and press Green to enter the Insulation limits screen. And ensure the tester is set as below.
Output: 500V
Limit: 1.00MΩ
Duration: 2s
Number: 1
Once complete again press the OK soft key to confirm.
The final test required will be a polarity test, scroll to the Polarity option and press Green to activate this test, under limit you will see YES. There are no user definable parameters to this test.
It may be that other tests are active in which case these can simply be removed from the sequence by scrolling to and entering the parameter selection screen. At this point scroll right to LIMIT, and use the up down arrows to select SKIP.
The final requirement is to change the name to something recognisable for this type of test. “Multi Way Extension” for example. Scroll to NAME, press Green to edit this field and alter accordingly. Press Green to confirm and press OK soft key to come back to the Test Sequence list.
At this point press green and you will see “Storing System Data” displayed.
The Sequence is now stored and ready to use.
When performing the test, the Supernova / Europa will want to perform unlimited amounts of Earth Bond tests, you will notice after a test it will then cycle back to the beginning of the Earth Bond test awaiting a press of the Green button to start the next Earth Bond. Repeat this process, ensuring your test IEC lead is connected into each socket for testing. Once you have tested all sockets for Earth Bonding, and the screen is awaiting another test, press the RED button, and select ABORT TEST.
This will then move the test sequence on to the Insulation resistance test, storing all Earth Bond results in memory

I'd like to talk to a sales advisor


Sign up to our Newsletter.
Stay up to date with the latest industry and product news, as well as our free educational content such as webinars and our expert guides.
Close