Using the Desk Test ‘n’ Tag Printer with the Supernova testers
The Desk Test ‘n’ Tag printer can be used to print long lasting pass and fail labels from the Supernova and Europa testers.
This guide covers how to configuring the printer, set up the print density, add a logo for your labels Setting up the Tester’
Configuring the Printer
1. Load the Configuration Utility which is supplied with the Desk Test n Tag printer in the form of a CD, however it can also be downloaded from the Seaward Website using the following URL.
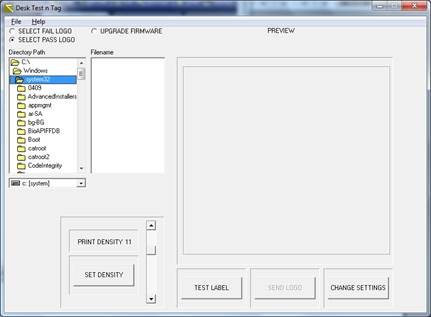
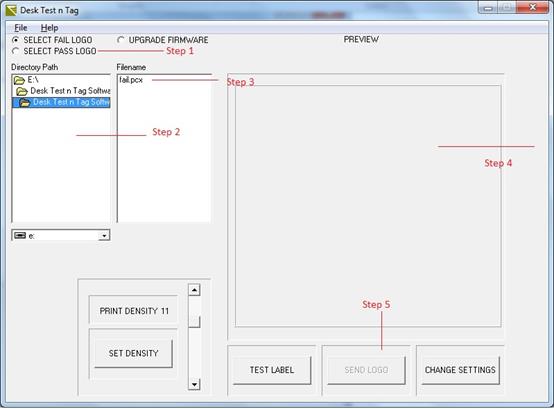
2. Run the program and the following screen will be displayed.
3. Connect the Desk Test n Tag printer to a PC via the supplied Parallel Cable as per the below picture.
4. To upload the config file first select ‘Upgrade firmware’, find the directory containing the config file (this should be the default location), click the required file. The upgrade option will then become active, press this to send the file to the printer.
5. The printer will print a label saying “….NOW IN PROGRAMMING MODE”. Wait for ALL of the LED’s on printer to stop flashing. Switch it off, and then switch on again.
6. The printer is now configured for the labels, use the TEST LABEL button to print a sample label and ensure the label file has been applied successfully.
7. In the same program, press the CHANGE SETTINGS button, the following screen will pop up.
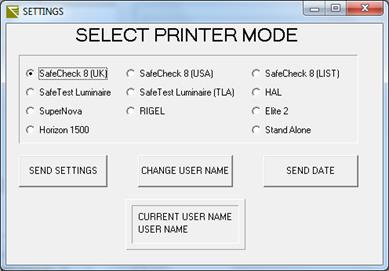
8. Select the correct model, Supernova in this instance, and press the SEND SETTINGS button, and at the prompt press OK.
9. The printer will print a label saying “….NOW IN PROGRAMMING MODE”. Wait for ALL of the LED’s on printer to stop flashing. Switch it off, and then switch on again.
10. The Printer is now configured for use with the required test instrument.
You can now set up the print density or add a logo for your labels. Alternatively to start printing labels from your tester jump to the ‘Setting up the Tester’ section.
Changing the Print Density
If the quality of print is not as expected, or the labels appear to stick, it may be likely that the density requires changing.
11. With the printer connected use the Print Density slider between 1 and 15. Then press the SET DENSITY button to send the settings to the Printer.
12. When the status lights have finished flashing on the printer, switch it off then back on again.
13. Press the TEST LABEL button to trial print a sample label to ensure the density prints as required. Generally we would suggest somewhere in the region of 10-12 would be the ideal density setting.
Adding a Pass or Fail logo
Creating the logo file
14. In order to change the logo it is first a requirement to create and save the logo into the correct file type.
15. If you are familiar with paint or graphics programs, you can create your own logo files.
- If graphics to appear in the logo space, you will need a high-resolution copy of the graphic. Print quality, 200 dpi less resolution and PCX format.
- There are tools on the web that can be utilised to change standard picture files (.jpg, . bmp etc) to .pcx format
- The dimensions of the logo are 360 pixels x 360 pixels or 4.57cm by 4.57cm.
- Graphics must be high contrast, black and white or line art.
- The PCX file should typically be less than 15k, any larger may not successfully load into the printer.
Uploading a logo file
16. The printer has the ability to store two logo files, one for a Pass and another for a Fail condition. Typical examples are shown below:

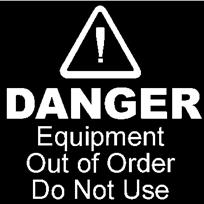
Example Pass Logo Example Fail Logo
17. Follow the below steps using the picture as guidance:
Step 1 -Select whether you wish to upload a Pass or Fail Logo
Step 2 – Find the Directory Containing the logo file
Step 3 – Click the required file
Step 4 – The logo will be previewed in the box shown
Step 5 - The Send Logo button will become active, press this to send the logo to the printer.
18. The printer will print a label saying “….NOW IN PROGRAMMING MODE”. Wait for ALL of the LED’s on printer to stop flashing. Switch it off, then switch on again.
19. The logo is now configured for the labels, use the TEST LABEL button to print a sample label and ensure the logo has been applied successfully.
Setting up the Tester
20. On your Supernova or Europa tester from the main menu go to SETUP then SYSTEM CONFIGURATION.
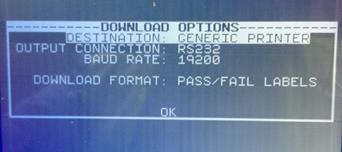
21. Go down to AFTER TEST and select DOWNLOAD. Select CONFIGURE and then use the green button to select the below options and press OK.
22. Connect the printer to the scanner using the serial cable provided with the printer ensuring to connect the side that says ‘PRINTER END’ to the printer.
23. The tester will now give the option print a pass or fail logo after each test.
I'd like to talk to a sales advisor


Sign up to our Newsletter.
Stay up to date with the latest industry and product news, as well as our free educational content such as webinars and our expert guides.
Close