Printing from Seaward Test Equipment to Desk Test n Tag Printer
The following guide is intended to aid the printing of labels from the below range of test equipment to the Desk TnT Version 2 printer;
- HAL Series
- SafeCheck 08
- Safetest Manufacturing (STML)
- Supernova Elite
Equipment Required
Test Equipment
Desk Test n Tag Printer
Serial Cable supplied with printer (See below image for reference)
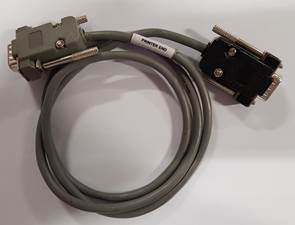
Connect the printer to the test equipment into the Serial port of the tester, ensuring the Grey end is connected to the printer (labelled as Printer End). For HAL series test equipment, ensure the cable is connected to the Printer port, identified with a printer icon.
Printing a label automatically upon completion of a Test
Printing a Pass or Fail Label – Large or Small Labels
This type of label will contain general test information, such as Asset or Serial Number, Date of Test, Test Operative and Overall Result. The printer must first be configured to print such labels.
Note: For details of configuring the printer, please see our Guide to Configuring the Desk Test n Tag Printer https://www.seaward.com/desktntutility3
1. From the Main menu of the test equipment, scroll to SETUP and press the green button to select.
2. Then scroll to SYSTEM CONFIGURATION and press the green button to confirm.
3. At the SYSTEM CONFIGURATION screen scroll to AFTER TEST, and select one of the options which begins with DOWNLOAD;
DOWNLOAD, OPTIONS
DOWNLOAD, NEW TEST
4. Once selected, the word CONFIGURE, will be displayed directly below, scroll to this and press the Green Button.
5. There will be four options that need configuring, the options to be set are shown below (Scroll to each option and press the Green Button to change the field)
DESTINATION – GENERIC PRINTER
OUTPUT CONNECTION – RS232
BAUD RATE – 19200*
FORMAT – PASS / FAIL LABELS
*If the printer does not print at the Baud rate, try 9600*
6. Once set press the OK key to confirm, then press the RED button to return to the main menu. The wording “STORING SYSTEM DATA” should be displayed to confirm the changes have been stored to memory
7. On completion of test, the label should be automatically printed.
Printing a Results Label - Large labels only
Note: This format is not suitable for HAL Series
This type of label will contain general test information, such as Asset or Serial Number, Date of Test, Test Operative and Overall Result along with the measured test results. The printer must first be configured to print such labels.
Note: For details of configuring the printer, please see our Guide to Configuring the Desk Test n Tag Printer https://www.seaward.com/desktntutility3
1.From the Main menu of the test equipment, scroll to SETUP and press the green button to select.
2. Then scroll to SYSTEM CONFIGURATION and press the green button to confirm.
3. At the SYSTEM CONFIGURATION screen scroll to AFTER TEST, and select one of the options which begins with DOWNLOAD
DOWNLOAD, OPTIONS
DOWNLOAD, NEW TEST
4. Once selected, the word CONFIGURE, will be displayed directly below, scroll to this and press the Green Button.
5. There will be four options that need configuring, the options to be set are shown below (Scroll to each option and press the Green Button to change the field)
DESTINATION – GENERIC PRINTER
OUTPUT CONNECTION – RS232
BAUD RATE – 19200*
FORMAT – LIST
*If the printer does not print at the Baud rate, try 9600*
6. Once set press the OK key to confirm, then press the RED button to return to the main menu. The wording “STORING SYSTEM DATA” should be displayed to confirm the changes have been stored to memory
7. On completion of test, the label should be automatically printed
Printing a Label from the Tester Memory
Printing a Pass or Fail Label – Large or Small Labels
This type of label will contain general test information, such as Asset or Serial Number, Date of Test, Test Operative and Overall Result. The printer must first be configured to print such labels.
Note: For details of configuring the printer, please see our Guide to Configuring the Desk Test n Tag Printer https://www.seaward.com/desktntutility3
1. From the Main Menu or Memory Options screen of the test equipment, scroll to DOWNLOAD RESULTS and press the green button to select.
2. There will be four options that need configuring, the options to be set are shown below (Scroll to each option and press the Green Button to change the field)
DESTINATION – GENERIC PRINTER
OUTPUT CONNECTION – RS232
BAUD RATE – 19200*
FORMAT – PASS / FAIL LABELS
*If the printer does not print at the Baud rate, try 9600*
1. Once set press the OK key to confirm
2. The SEARCH FOR DOWNLOAD DATA screen will be displayed allowing the data to be downloaded to be narrowed down to the required results. Options such as Test Result, User and Dates can be selected. If the Serial or Asset number is known this can also be entered
Note, in the default state, everything in the memory of the tester will be downloaded. The options for this will be denoted with a *
3. Once set to required parameters, scroll to, or select START SEARCH to begin the download process, a label should be printe
Printing a Results Label - Large labels only
Note: This format is not suitable for HAL Series
This type of label will contain general test information, such as Asset or Serial Number, Date of Test, Test Operative and Overall Result along with the measured test results. The printer must first be configured to print such labels.
Note: For details of configuring the printer, please see our Guide to Configuring the Desk Test n Tag Printer https://www.seaward.com/desktntutility3
1. From the Main Menu or Memory Options screen of the test equipment, scroll to DOWNLOAD RESULTS and press the green button to select.
2. There will be four options that need configuring, the options to be set are shown below (Scroll to each option and press the Green Button to change the field)
DESTINATION – GENERIC PRINTER
OUTPUT CONNECTION – RS232
BAUD RATE – 19200*
FORMAT – LIST
*If the printer does not print at the Baud rate, try 9600*
1. Once set press the OK key to confirm
2. The SEARCH FOR DOWNLOAD DATA screen will be displayed allowing the data to be downloaded to be narrowed down to the required results. Options such as Test Result, User and Dates can be selected. If the Serial or Asset number is known this can also be entered
Note: In the default state, everything in the memory of the tester will be downloaded. The options for this will be denoted with a *
3. Once set to required parameters, scroll to, or select START SEARCH to begin the download process, a label should be printed
I'd like to talk to a sales advisor


Sign up to our Newsletter.
Stay up to date with the latest industry and product news, as well as our free educational content such as webinars and our expert guides.
Close